Wiring
OK, I wasn't going to cover
this but I figured I could add what little I know to the
conversation. There are a bazillion (that's a technical
term) different ways to wire any guitar so I'm not going to
get too far into the exact details. What I am going to cover
is forward planning and a few tips. Before you start to do
any wiring, go to Seymour
Duncan's Wiring Diagram Library page and look around.
You can probably get a fair idea of what you want to do from
there. Now, here's a funny thing (just kidding, it's not
funny), every pickup vendor uses different wiring colors for
Start, Finish, Ground, etc. Make sure you check your pickup
vendor's documentation. Once you've figured out what's what
you can probably translate the Seymour Duncan diagrams to
fit your pickups.
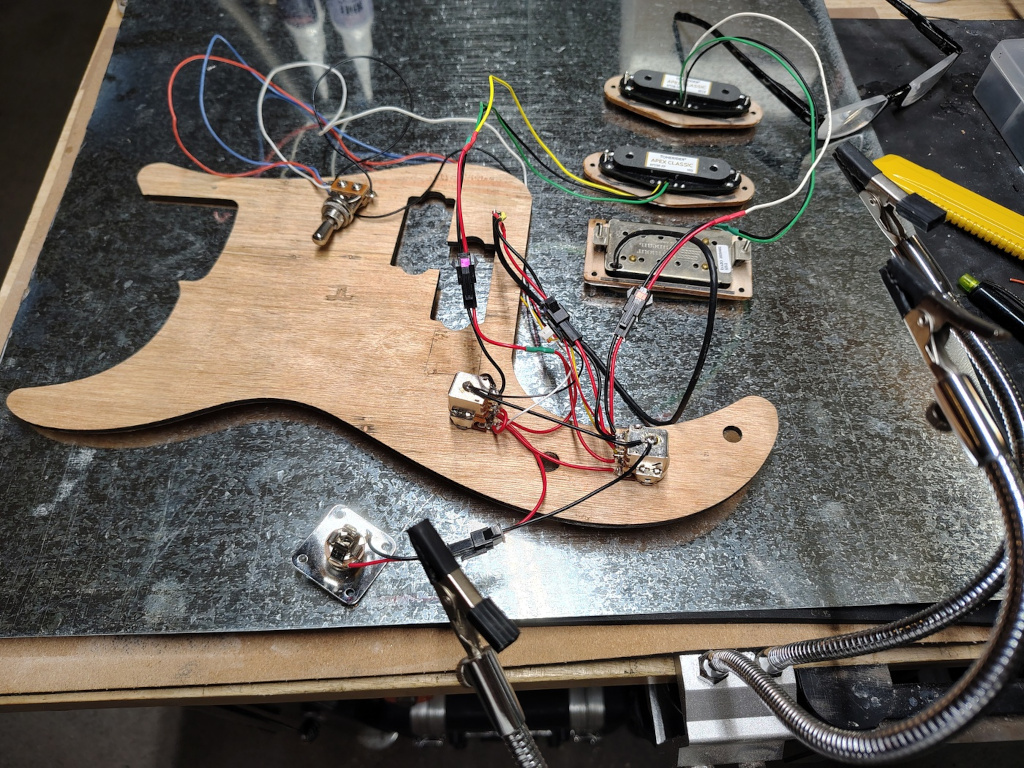
The above picture shows the complete wiring harness for my three pickup shorthorn single cutaway guitar. Notice the little connectors. These are called JST (Japan Solderless Terminal) connectors. They allow you to connect and disconnect the pickups without having to solder anything. I have labelled them according to which pickup wires go to which part of the pot, switch, and jack connectors. For the pickups I have a color scheme that I use to keep track of which connectors are for which pickup. For the bridge pickup I use blue. For the middle pickup I use magenta. See what I'm doing there? For the neck pickup I use red... Wait, What? Yeah, it's not alliterative but I have no problem remembering red/neck. The switch is connected by a 5 wire (with one removed) mini JST. Since it's unique there is no question what it connects to. The output jack is labelled J/white. Now, I know this looks like a giant rat's nest but there are a few major advantages to doing it this way. First, you can completely wire the guitar outside of the guitar body, disconnect the JSTs, then put all of the electronics into the guitar. Second, you can test the wiring harness outside of the guitar (you have no idea how many times I've soldered something together, put it in the guitar, and then had to take it out again because I did something stupid). The third advantage is that, if you need to change a switch, a jack, or one or more pickups, you don't have to un-solder anything.
One other thing to notice is the output jack. It is a PureTone Multi-Contact jack. If you don't ever want to have to deal with a noisy jack this is the way to go. A bit more expensive than the normal single-contact jacks but worth the money.
Now, I've always loved everything about the Telecaster guitar... except for the pickups... and the switch location... and the knob locations... and the lack of an arm cut... and the lack of a belly/rib cut... and the scale length... and, of course, the stupidly long horn. Other than that, I love everything about the Telecaster. So, the guitars that I build for myself are shorthorn with an arm cut, a rib cut, upper bout pickup switch, different knob locations, short scale conversion neck, and Strat HSS style pickups.
I'm using Tonerider neck and middle pickups (they are phenomenal, sound just like Strat single coils but with zero hum, and only about $65 each) and a Seymour Duncan StagMag SH-3 "humbucker" for the bridge pickup. Now, when I designed this little nightmare I realized that I hate 5 way switches so I wanted to stick with the normal 3 way switch. But, I also wanted to be able to get all the normal Strat sounds. I figured that I would mostly be using the normal Tele neck, bridge, and neck+bridge settings so those went to the 3 way switch and I used a couple of push/pull pots to get the other sounds (plus one). I had to design the circuit myself (I scribbled it down on a piece of paper). I backfit one of my earlier guitars with this setup and found that I really liked the middle pickup by itself (Pride and Joy, Heaven, Sultans of Swing) but I wasn't real fond of the neck+middle, bridge+middle, or the neck+middle+bridge. Because of that I switched the tone and volume push/pull wiring around from what's in the following diagram (worked up in GIMP from my scribbled piece of paper and some of Seymour Duncan's wiring diagrams). And, of course, I'm using a "humbucker" in place of the normal bridge pickup. Note that, even though the StagMag has 4 conductor wiring, I'm not doing any switching on it. I have it wired in series. I don't really need any other sounds than what I get with the three pickups.
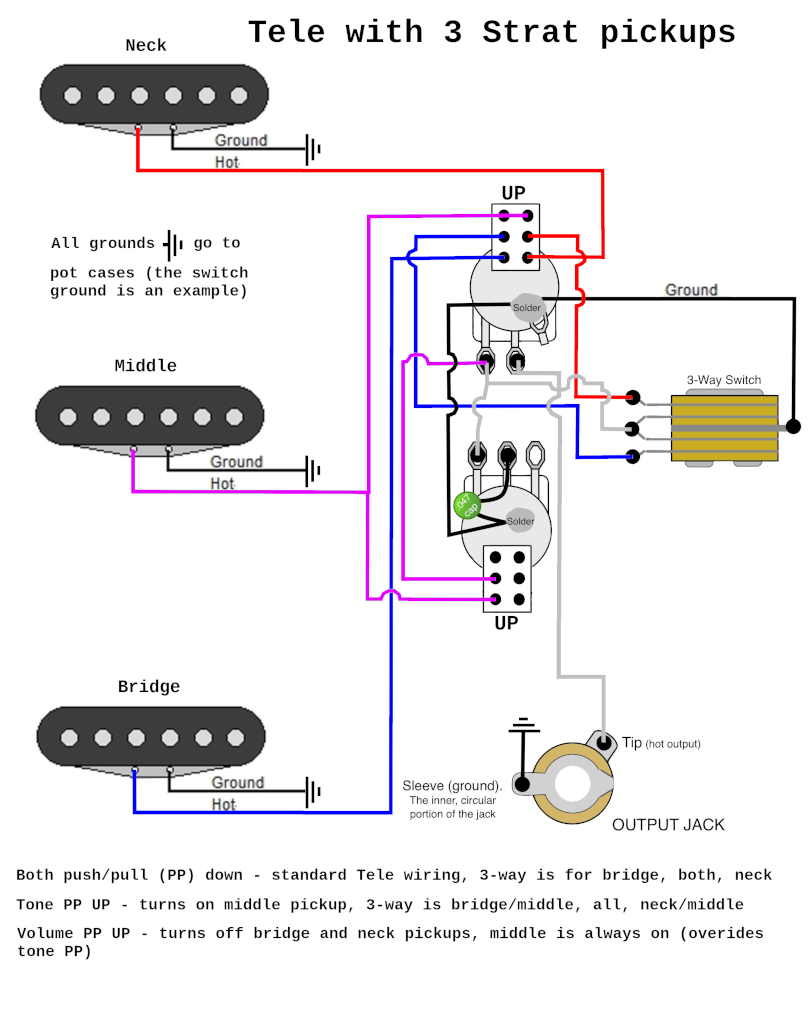
Since the 3 way switch is in the upper bout I run four wire from it back to the pot control cavity. White/hot, black/ground, blue/bridge, and red/neck. Once you've got those run you can button up the switch cavity.
Let's see, what other fun things have I learned? Oh, yeah. You need three arms to solder anything. You should get one of those "helping hands" soldering station things like the one in the first image. Don't go for the cheap ones, they suck. Get one of the ones with flexible arms. The one I got clamps on to the side of my workbench. It is, of course, no longer available. Don't get one with a bottom platform because it will be difficult to get it close to the guitar body if you have to work on something inside the body. Um, get some flux because "tinning" wires is a PITA without it. Get some heat shrink tubing (there are a bunch of variety kits on Amazon). Last, but not least, never blow on a solder connection to harden it. That can cause a "cold" solder joint.
Hope that helps.
The above picture shows the complete wiring harness for my three pickup shorthorn single cutaway guitar. Notice the little connectors. These are called JST (Japan Solderless Terminal) connectors. They allow you to connect and disconnect the pickups without having to solder anything. I have labelled them according to which pickup wires go to which part of the pot, switch, and jack connectors. For the pickups I have a color scheme that I use to keep track of which connectors are for which pickup. For the bridge pickup I use blue. For the middle pickup I use magenta. See what I'm doing there? For the neck pickup I use red... Wait, What? Yeah, it's not alliterative but I have no problem remembering red/neck. The switch is connected by a 5 wire (with one removed) mini JST. Since it's unique there is no question what it connects to. The output jack is labelled J/white. Now, I know this looks like a giant rat's nest but there are a few major advantages to doing it this way. First, you can completely wire the guitar outside of the guitar body, disconnect the JSTs, then put all of the electronics into the guitar. Second, you can test the wiring harness outside of the guitar (you have no idea how many times I've soldered something together, put it in the guitar, and then had to take it out again because I did something stupid). The third advantage is that, if you need to change a switch, a jack, or one or more pickups, you don't have to un-solder anything.
One other thing to notice is the output jack. It is a PureTone Multi-Contact jack. If you don't ever want to have to deal with a noisy jack this is the way to go. A bit more expensive than the normal single-contact jacks but worth the money.
Now, I've always loved everything about the Telecaster guitar... except for the pickups... and the switch location... and the knob locations... and the lack of an arm cut... and the lack of a belly/rib cut... and the scale length... and, of course, the stupidly long horn. Other than that, I love everything about the Telecaster. So, the guitars that I build for myself are shorthorn with an arm cut, a rib cut, upper bout pickup switch, different knob locations, short scale conversion neck, and Strat HSS style pickups.
I'm using Tonerider neck and middle pickups (they are phenomenal, sound just like Strat single coils but with zero hum, and only about $65 each) and a Seymour Duncan StagMag SH-3 "humbucker" for the bridge pickup. Now, when I designed this little nightmare I realized that I hate 5 way switches so I wanted to stick with the normal 3 way switch. But, I also wanted to be able to get all the normal Strat sounds. I figured that I would mostly be using the normal Tele neck, bridge, and neck+bridge settings so those went to the 3 way switch and I used a couple of push/pull pots to get the other sounds (plus one). I had to design the circuit myself (I scribbled it down on a piece of paper). I backfit one of my earlier guitars with this setup and found that I really liked the middle pickup by itself (Pride and Joy, Heaven, Sultans of Swing) but I wasn't real fond of the neck+middle, bridge+middle, or the neck+middle+bridge. Because of that I switched the tone and volume push/pull wiring around from what's in the following diagram (worked up in GIMP from my scribbled piece of paper and some of Seymour Duncan's wiring diagrams). And, of course, I'm using a "humbucker" in place of the normal bridge pickup. Note that, even though the StagMag has 4 conductor wiring, I'm not doing any switching on it. I have it wired in series. I don't really need any other sounds than what I get with the three pickups.
×
![]()
Since the 3 way switch is in the upper bout I run four wire from it back to the pot control cavity. White/hot, black/ground, blue/bridge, and red/neck. Once you've got those run you can button up the switch cavity.
Let's see, what other fun things have I learned? Oh, yeah. You need three arms to solder anything. You should get one of those "helping hands" soldering station things like the one in the first image. Don't go for the cheap ones, they suck. Get one of the ones with flexible arms. The one I got clamps on to the side of my workbench. It is, of course, no longer available. Don't get one with a bottom platform because it will be difficult to get it close to the guitar body if you have to work on something inside the body. Um, get some flux because "tinning" wires is a PITA without it. Get some heat shrink tubing (there are a bunch of variety kits on Amazon). Last, but not least, never blow on a solder connection to harden it. That can cause a "cold" solder joint.
Hope that helps.
Copyright © Jan Depner 2026 - All rights reserved